

Sometimes, you have to say it straight: Google does not build Android with unit testing in mind. Even as recently as API 30, the platform continues to evolve in this unfortunate direction, making critical components of your app increasingly challenging to test. Thus, if you want to build an app with 95% or higher code coverage, then the burden lies with the app developer to make this a reality.
Yet is it such a burden to achieve such a respectable amount of code coverage? I would argue this is only a perceived burden, one which an engineer can reduce with a bit of discipline by following best practices.
The Blueprint
These concepts are effectively the TL;DR version of this article since they form the basis of every pattern I will discuss:
- Extract as much logic as possible from classes that inherit from Android APIs
- Interact with Android APIs through forwarders and factories
- Isolate the code you plan to exclude from testing (???!!?!!) More on this later.
It turns out that some architectural patterns seem to lend themselves automatically to this blueprint. Thus, it makes these concepts quick to adopt, and the argument against writing unit tests much harder to believe. :)
Note: I do not intend to teach you how to write unit tests or enforce any testing style. At this point, I hope you already understand how unit testing works. The rest of this article discusses one approach and the necessary tools to maximize your ability to write these tests in whatever style you already use in practice.
Why Bother?
Notice how the Android API is the familiar term in several of the above points. Let’s clarify why these concepts are so important from a unit testing standpoint.
Extract Logic & Limit Inheritance
From a testing perspective, these two concepts serve the same purpose. An experienced Android developer knows that it is impossible to create an application and entirely forgo using inheritance. Some of the essential parts of the program require subclassing, including, but not limited to:
- Activities
- Fragments
- Custom application classes
- Background services
Some tools within the open-source community permit testing a few of the hard-to-test components — such as Robolectric for testing Activities — by mocking their lifecycles. However, this poses several problems:
- It encourages engineers to build monolithic, tightly-coupled views that contain all of their logic in one place. This practice follows the pattern established by many of the Introduction to Android Programming videos available on YouTube. It gets the job done but does not attempt to test any of the code or follow best practices. According to Erich Gamma, the author of the acclaimed book Design Patterns: Elements of Reusable Object-Oriented Software, engineers ought to avoid this pattern for these reasons.
- The whole point of the activity or fragment is lost when adding business logic to it. These components are lifecycle drivers since it is the way the operating system drives each part of your app. These classes are not a catch-all container for a mixed bag of code to power your view. Sadly, too often, this is the case.
- Test run times increase by several orders of magnitude. Standard JUnit tests can run hundreds, even thousands of tests in the same amount of time it takes Robolectric to start up and run just a few of them.
Our goal is to set up our architecture to sideline Android as much as possible. The API serves its point in production, but that point is null and void in the context of testing. You are testing your app, not Android.
Use Forwarders and Factories
I usually call these "wrappers," even though that is not the correct term for this handy technique. In short, forwarders use the properties and call another underlying class’s methods whenever invoking the forwarder. It is similar to a wrapper in that it wraps the interface of something else within its own. However, unlike wrappers, a forwarder’s interface has a one-to-one correspondence with the names, properties, and methods that it wraps. There is no simplification, extra work, or magic going on when calling a forwarder. If this sounds silly, I will soon show why this is necessary with several examples.
Factories, which are a more familiar concept to Java developers, wrap the interface of a constructor inside a class’s method. Both forwarders and factories are useful in different cases.
Here is one such instance. Many of the Android library’s classes do not function when included as part of a unit test. The `Uri` class is a classic example. If you attempt to inject a `Uri` and add properties to it in your unit test, you’ll be in for a hair-pulling session. `Uri` objects do not function in a unit test, even though they behave fine when running your app. You need a factory to wrap this object’s construction to use it in production and mock it properly during testing.
Isolate Untested Code
Notice how, in this article’s opening paragraph, I didn’t promise to demonstrate an app with 100% unit test coverage. Quite honestly, this is unrealistic since you will be writing code whose whole point is not to require testing. As I discussed above, the purpose of factory and forwarder classes are to be "stupid" pieces of code that do not need to be tested but unlock the ability to test other more critical parts of your app.
As I will show later, `Activity` classes also fit this description. The architecture I will discuss inherently makes them more "stupid" code whose sole purpose is to call something else. The Android engineers designed `Activity` classes to be lifecycle drivers whose functions are called by the OS. Letting them serve only that purpose not only helps us fulfill the single-responsibility principle, but it helps us avert intimidating technical challenges. By default, you’ll find most of the functions on those classes, such as `onCreate()`, are marked as `protected`. Calling them in a unit test requires reflection, which begs whether there is a better way to do this. Of course, since we are talking about isolating code, that is the approach I take to work around this issue.
The Architecture
What is this magical architecture I’ve been discussing, and how does it enable an engineer to test an app more thoroughly? I don’t promise to blow your mind with this unveiling. It’s MVC. No, the "M" in MVC does not stand for magic.
Unfortunately, not even Google’s official Android Architecture Blueprint repository offers a solution as elegant as MVC. Digging into a piece of their sample code reveals a similar dilemma as many other examples online. In that code sample, you can find violations of patterns 1, 2, and 3, expressed at the top of this document. Technically, one could figure out a way of unit testing this. However, it is much more straightforward and reliable to undertake unit testing when following a different approach.
I’ll leave the details of why Google’s suggested approach is not optimal to Vasiliy Zukanov, a professional Android developer, blogger, and educator whose excellent architecture course inspired this article. Here is the link to the relevant video (purchase of his Udemy course is required), where he shares his insights into Google’s approach.
In short, MVC helps an engineer abide by patterns 1 and 3 by its very nature. Concept 2, however, is still up to the responsible engineer to implement, regardless of the architecture.
Let’s Write Code
Enough theory. Let’s get started. I’ll show how to structure your app to follow these patterns and pave the way for comprehensive unit test coverage. To get started, here are the tools you’ll need in your tool belt:
- My completed sample application from GitLab, inspired by Vasiliy’s Udemy course
- Android Studio
- Dagger 2
- JUnit, Mockito, Expekt (assertion library), and Spek 2 (BDD-style unit testing framework from JetBrains)
- Patience
We will be using Vasiliy’s repository as a source of inspiration for this project, not as a place to wholesale copy and paste code. I’ll be using Kotlin in my project, though you can use Java if you wish. If you use Java, you will need to write TDD-style JUnit tests since Spek works best with Kotlin.
For added convenience, I suggest installing the IntelliJ and Android Studio plugin for the Spek Framework. It provides excellent granularity for running individual tests and test suites.
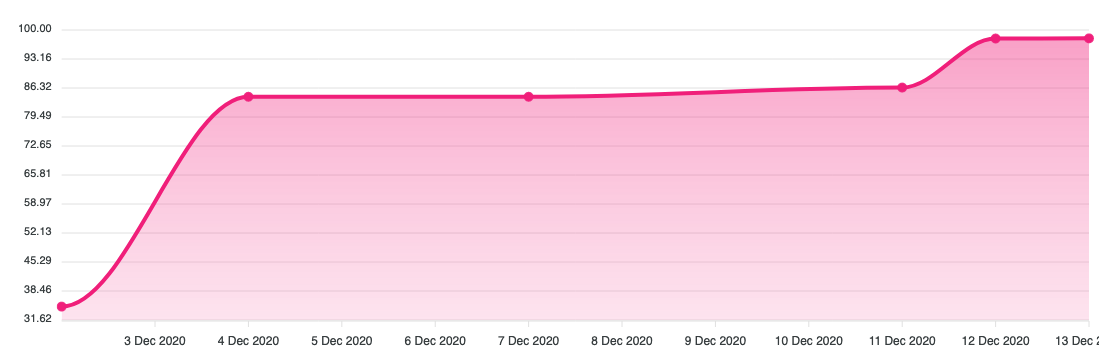
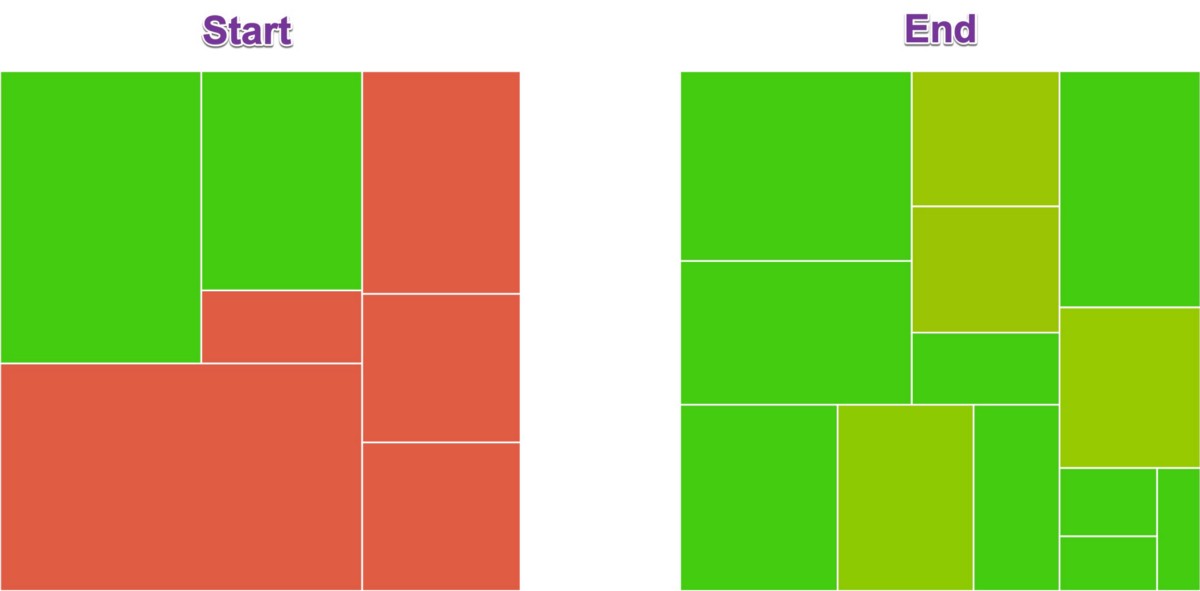
By the end of this article, I’ll have shown how my coverage went from 34% to 98%.
During its development, I filled in the discrepancies shown in the chart on the left and ended with a coverage chart like the one on the right. Dark green indicates more coverage for a particular class, and dark red indicates less coverage.
The patterns employed in this article and its corresponding app are reliable and should serve as a useful guide for your project.
Foundations
Before we can dive into the views and control logic of this application, we need to prepare the groundwork to achieve blueprint points 1, 2, and 3.
Dagger & The Object Graph
The Dagger library is a dependency injection framework that will go a long way in helping us fulfill requirements 1 and 2. Here are the specific capabilities it grants us:
- In most cases, the app does not instantiate any classes outside of the object graph and its associated wrappers. Of course, this is a huge necessity for any amount of unit testing.
- It decouples the creation of the MVC components for each screen. The graph creates controllers, injects them with regular DI, and the factory for creating and controlling the intended view is also provided similarly.
- The graph provides all of the factories and forwarders as the facade into the classes that would otherwise not work during a unit test or would require in-place instantiation.
This practice underscores a fascinating concept. The same classes which inherit from the Android API, and we are making such an effort to sideline, can still benefit from Dagger and follow best practices by building the object graph and late injecting the components into itself. In essence, we aren’t calling these classes a lost cause because it breaks our foundational principles of unit testing. We follow best practices as much as possible, for as long as possible, until it is impossible.
Dependency Injection Architecture
There are several moving parts to this aspect, which I’ve thus far just called "Dagger." While there are many ways to arrange this tool to work for your project, here is a pattern that I have found works well.
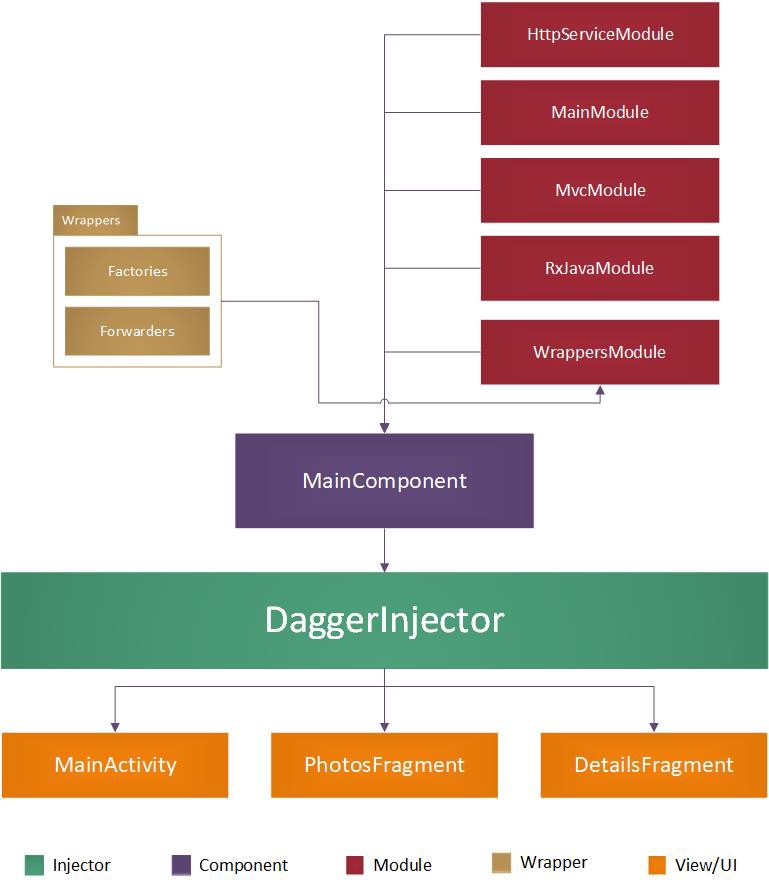
While the names in the above diagram show exactly how the sample application uses DI, focus on the concept rather than the specific words. You will have different classes, more modules and components, and more varied user interfaces for your application. Look at the colors and arrows, instead. Here is how I see this diagram:
- A `wrapper` package contains all of the factories and forwarders. This package gets module a dedicated module, and the `WrappersModule` creates each instance of a factory or forwarder class.
- All other modules encapsulate a general concept of related items. For example, `MainModule` holds all of the things related to the `MainActivity`, such as a reference to the class itself, `context`, and anything else subsequent screens and utility classes may need to know about their parent activity. These names are highly context-specific and may vary significantly in your application. If, for instance, I had more networking going in inside of my app, I may generalize the `HttpServiceModule` into something like `NetworkModule` and use it to build a more broad set of classes.
- The modules are injected into whatever components require them. It’s just standard Dagger practice.
- The `DaggerInjector` is just an object (in Kotlin terms), or a static class (in Java terms). Whenever it receives a request to build an object graph, it builds it, caches the graph in static memory, and returns a reference of that graph to the caller. Subsequent calls to the `DaggerInjector` simply reference the cache to use DI.
In my applications, I usually build one component per activity. So, since this application only has a single activity, there is just one component. However, should this application grow to include more activities, they would still flow through the `DaggerInjector`. It would just have more functions to build the requested component and cache it.
As far as modules go, I follow a loose set of rules. I imagine that I have `N` number of buckets and M things to go inside those buckets. Let’s say that `M` is always much greater than `N`. Now, given my limited number of buckets, how I would categorize my `M` items so that they can logically fit into those `N` buckets? Now replace "buckets" with "modules" and "things" with "classes I need to inject." Get the idea?
Before moving onto the next concept, there is one last detail I left out of the first diagram which is important to discuss. `MainActivity` is a prerequisite for building the object graph. Down the road, I know that several modules and screens may need access to it and the ever-ubiquitous `context` that it provides. Here is how I provide that activity to the graph:
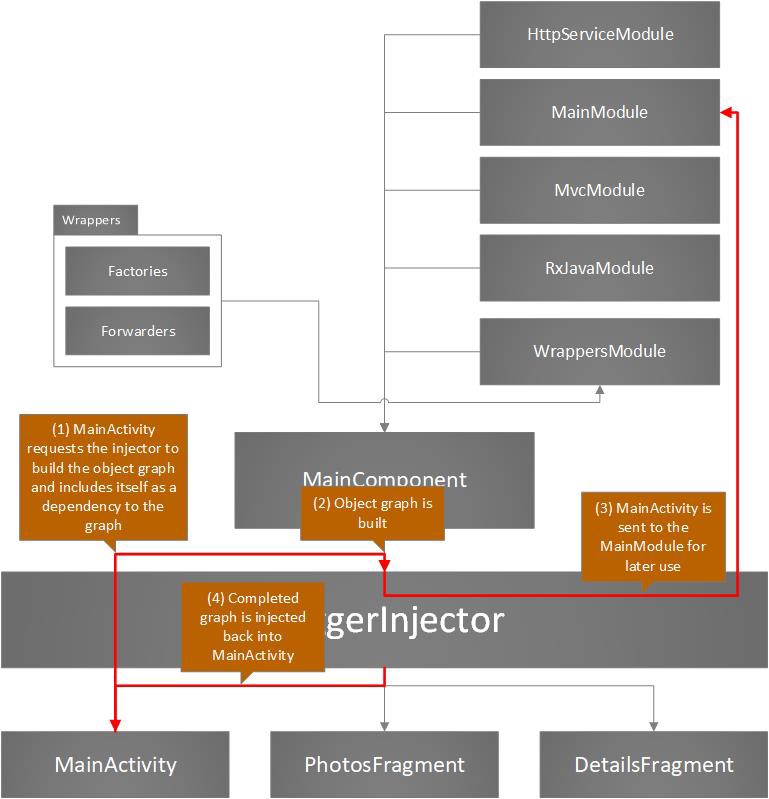
Specifically, this is the entire flow from the time that the `MainActivity` requests an object graph, to the time it receives all of its dependencies:
- Android invokes `onCreate()` on the activity.
- `buildMainComponent(activity)` is invoked on the `DaggerInjector`. This method is a static function on the injector which builds the graph, using the supplied reference to the `MainActivity`.
- The builder gives the activity to whichever modules require it as a dependency.
- The builder creates the graph and caches it as a static property on the injector.
- The `buildMainComponent()` returns a reference to that graph and the `MainActivity` uses it to inject the missing classes into itself.
Since `Activity` classes cannot be instantiated by the user, the dependencies are late injected in `onCreate()`. This process happens as early as possible in the activity lifecycle to ensure all downstream procedures have the tools they need to function.
To see how this works in practice, look at the code here: Android Dagger Setup.
MVC Base Classes
One of my favorite aspects of this particular pattern is that you are not dependent on any third-party libraries to do the heavy lifting for you. Other architectures, such as Redux or Flux, can have so much overhead that you need to use a library to lighten the load. Not so with MVC! This bad boy boils down to 5 classes, 2 of which are just interfaces.
I won’t go through each class in detail, but will provide a general explanation of the high points:
- `ViewMvc` The base class for all MVC interfaces and classes. It merely holds onto a reference of the inflated view.
- `BaseViewMvc` Adds additional functionality to the root view saved in the `ViewMvc`, such as finding the view’s `context` or locating sub-views within the screen with `findViewById()`.
- `BaseObservableViewMvc` Based on `BaseViewMvc`, this class adds the ability to register listeners to respond to custom events, such as button taps, swipe gestures, or anything else a view may wish to dispatch.
- `ViewMvcFactory` Generates all of the `ViewMvc` classes for each screen and injects the necessary dependencies into each view.
That’s it. If you are interested in seeing what these look like, take a look at the code here. As you will see later, these classes help us establish a pattern we use to exercise requirements 1 and 3.
Ignore Filters
The last foundational point I’ll discuss is the JaCoCo ignore filter. Having done everything possible to isolate and prepare our classes for unit testing, there are just some less critical areas that need to be left behind. This is the final aspect of pattern 3 that our setup helps us achieve. Here is the code coverage exclusion filter:
What kinds of classes didn’t make the cool kids club and got excluded? These filters cover several categories:
- Activities: We’ve already spoken in depth about this.
- Models: These files don’t contain any code worth testing since it is just a data container. JaCoCo still likes to cover these things unless told otherwise.
- Dagger and DI: For obvious reasons, any code related to DI, factories, and forwarders are excluded. This also includes the ViewMvcFactory.
- Auto-generated code: If I (or my teammates) didn’t write the code, then we don’t bother unit testing it. The Android build process, Dagger, and the Android Navigation Component collectively create a lot of extra classes that we can forget about.
To see how this works in practice, look at the code here: App Module Gradle File.
Implementation
With the foundations set firmly in place, let’s start using them to build an app. We’ll start by looking at how the `MainActivity` is built, move onto each of the fragments, and end by examining non-view related classes.
Activities
Starting from the top of this project is the `MainActivity`. In this application, it serves the humble, yet respectable role of a fragment container. It does not contain any business logic. So, this will serve as a nice and easy springboard into the general concepts of MVC in practice.
Here are the aspects of MVC used for this activity:
- Lifecycle driver: `MainActivity`
- Model: `MainViewMvc`
- View: `MainViewMvcImpl`
- Controller: Not present and not needed
Let’s refer back to the blueprint I established at the beginning and see how these concepts are applied here:
- Extract logic from Android API child classes: All work is deferred to the `DaggerInjector` for creating the object graph and the `ViewMvcFactory` to inflate and set up the views. Again, no business logic is present since this is just a view container, so you will not find a `MainController` anywhere.
- Interact with Android through factories and forwarders: Since all activities must inherit from an `AppCompatActivity`, there is only so much which can be done here. Otherwise, you can find that the `MainViewMvcImpl` receives a pre-built `LayoutInflater` as a constructor parameter. It’s a simple case, but check-mark anyway.
- Isolate the code to exclude from testing: Similar to point number 1, `MainActivity` is inherently an Android API that is very difficult to test. Thus, it doesn’t contain anything of value to unit test and is excluded from coverage reports altogether. If I did something wrong in the `MainActivity`, such as neglect to initialize the view or object graph, you’d know it right away when opening the app. No need to depend on a unit test to tell you that something went wrong.
With all of that cleared up, here is the entirety of the `MainActivity`:
It’s short, sweet, simple, and has one job: drive the lifecycle. Hopefully, that point is driven home now. :) With everything else related to this view disassembled into testable components, the rest of the job is light work.
Fragments
Tipping the scales at just two fragments, this application is small enough for us to go through each screen with a fine-tooth comb. Once again, let’s look at the MVC components in play:
- Lifecycle drivers: `PhotosFragment` and `DetailsFragment`
- Models: `PhotosViewMvc` and `DetailsViewMvc`, respectively
- Views: `PhotosViewMvcImpl` and `DetailsViewMvcImpl`, respectively
- Controllers: `PhotosController` and `DetailsController`, respectively
Unlike `Activity` classes, `Fragment` classes can be unit tested easily. It can be instantiated as the unit under test, and its methods can be invoked as easily as one would expect. Then why, you might ask, would we bother going through the effort to extract a fragment into its discrete parts when it could be tested directly? For all of the same reasons addressed above.
- We are following the single responsibility principle when we use the fragment sole for its lifecycle. Fragments aren’t suddenly a free-for-all since they are simpler to test.
- Controllers and view models offer a strong separation of concerns and can be built to be very descriptive about what each view can do, how data flows through it, and the business logic it contains.
- When following an architectural pattern, a uniform application to as many parts of your app as possible will decrease the app’s cognitive complexity and make onboarding new members more simple.
Once again, let’s examine how these fragments break down to satisfy the opening principles:
- Extract logic from Android API child classes: As with the `MainActiviy`, we can see that each fragment has its dependency graph built by the `DaggerInjector`. Then, it proceeds to use the injected controller and `ViewMvc` instance to carry out the rest of the responsibilities. Very little essential code remains inside of each fragment.
- Interact with Android through factories and forwarders: Across both the `PhotosController` and the `DetailsController`, I counted 10 factories and forwarders in play. That may sound like it’s trending toward an unmanageable amount of wrapper classes for larger apps. I work professionally on a much more extensive app and can attest that this idea scales well. Keep in mind that these wrappers are built to cover a broad range of needs. For example, there are just a few needed to wrap all of Android’s navigation functions. Others wrap interfaces to RxJava. On an app with, say, 100+ screens, these classes would be used over and over again. While larger apps may need more factory and forwarder classes, smart categorization of each class’s responsibility helps keep things at a very manageable size.
- Isolate the code to exclude from testing: As stated above, since `Fragment` classes can be unit tested, there is no reason to exclude them from coverage reports. More testing means more coverage karma! Who doesn’t want that?
Non-Fragment and Non-Activity Views
What do I mean by that? There are plenty of classes in Android apps that appear on the screen and are not fragments or activities. Some examples include recycler views, list views, and custom components. While my demonstration app does not include any custom components, it does have a recycler view on the main screen. Let’s take a closer look at it. Here are it’s MVC components:
- Lifecycle driver: `PhotosAdapter`
- Model: `PhotoListItemViewMvc`
- View: `PhotoListItemViewMvcImpl`
- Controller: Not present and not needed
I know that the lifecycle driver may feel a bit strange since it isn’t following the "standard" flow we use with activities and fragments. Recycler views don’t need to follow that same pattern. All it needs are several functions to bind the data, create the view, and count the total number of items. That’s its lifecycle.
Furthermore, since the individual list items don’t have any business logic, I’ve forgone using any controllers here. Only the `ViewMvc` classes are needed for setting up the view and reporting on button presses.
Let’s look at how this part of the app satisfies the original requirements:
- Extract logic from Android API child classes: Much like the previous two examples, there is always a some code that must inherit and interact with Android APIs. The `PhotosAdapter` class and its inner class, the `PhotosAdapter.ViewHolder`, are the unavoidable examples, in this case.
- Interact with Android through factories and forwarders: Aside from the adapter and view holder classes, all other classes and static methods are invoked through 2 injected wrappers.
- Isolate the code to exclude from testing: Like `Fragment` classes, the `RecyclerView.Adapter` can be fully unit tested. So, there is no reason to skip it.
One line in the `PhotosAdapter` class does something that no other part of the application outside of Dagger has done. It instantiates a class.
I could have used a factory to create a new instance of a `ViewHolder`, but all I’m interested in when I unit test is:
- the `ViewMvc` registered a listener
- I receive a `ViewHolder` in return
This setup in my code paves the way to do both of those things in my tests.
Everything Else
With the hard parts behind us, it’s simply: wash, rinse, and repeat. Most of the other classes in my application can be instantiated as the unit under test and executed directly. Yes, I still inherit from Android APIs in my assortment of other classes. However, since I can create and interact directly with these classes, I see no reason to perform the isolation ritual with them. Plus, since these classes aren’t views, I wouldn’t apply MVC patterns to them. What is the view in a service class? Where is the lifecycle driver? With all practical options exhausted, it makes good sense to keep these classes all self-contained.
Conclusion
That is the best roadmap I can offer for your trip along the winding unit testing journey. As you can see, the foundational patterns introduced at the beginning of the article were an excellent guide along most of this excursion. However, once things became a little easier, and we weren’t writing code for things that would show up on screen, it made sense to slacken the rules, get creative, and test the way that feels right.
Once again, I’ll leave you with my sample application for reference. The official coverage report I have for this project pegs it at 98% covered (or 97.52% for you hair-splitters.) That’s a far cry from the 34% I achieved at the beginning of the project.
That being said, it is indeed possible to achieve such high numbers. All it takes is good practice and a bit of discipline.
Epilogue: A Warning with JaCoCo
JaCoCo is the de facto code-coverage reporter for JVM languages. It’s not afraid, however, to remind you that its first allegiance is to Java. Its name is an acronym for Java Code Coverage. Thus, when you start to use it with other languages, you may encounter some surprises.
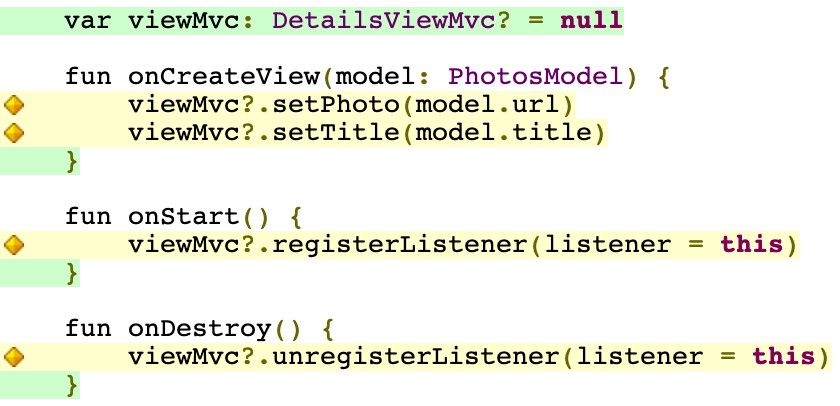
Kotlin supports null safety operators, one of which is the `?.` operator seen frequently in Kotlin code. So, whenever you do something like this:
It runs on the JVM like this:
If you forget to test what happens when your `viewMvc` is `null`, JaCoCo will flag that line with a missing branch coverage warning. Now you can see why.
That leaves you with two options, test all of the possible `null` conditions like it is when it runs on the JVM, or forget about it. It’s up to you. For my sample project, I did test the `null` branches, but your team may choose to ignore that metric and focus on something like line coverage instead. I thought it only fair to warn you.
Credits
Once again, I’d like to thank Vasiliy Zukanov for his Udemy course, which inspired this article. Please be sure to check it out, along with his collection of courses on Udemy.
The rest of this article was garnered over time from experience, trial and error, outsider recommendations, and hard knocks. Thank you for reading.
.svg)


 DR Android


